


Tampilkan postingan dengan label Free Programs. Tampilkan semua postingan
Tampilkan postingan dengan label Free Programs. Tampilkan semua postingan
Kamis, 14 Oktober 2010


Rabu, 13 Oktober 2010
KMPlayer - Free Download

KMPlayer has a small desktop footprint and its minimalist interface makes video playback quick and hassle-free. The player's interface is fully skinable, and there are some nice aesthetic touches, such as the changing of colour on the player with every new track.
There are all sorts of options to help you pimp and customize KMPlayer, such as visualizations, plug-ins and playback options. But the beauty of KMPlayer is that these are turned on at your request rather than being forced upon you at the outset.
KMPlayer handles both audio and video, and supports a wide range of different formats, meaning that once installed, you should never need to touch another player. Video playback is particularly impressive thanks to the range of processing tools available that allow you to sharpen, change picture properties, apply filters and even make video captures from within the program.
If you're looking for a customizable, light yet powerful video player, KMPlayer is exactly what you need.
Winamp 5.58 Free Download

What is New in Winamp 5.58?
Major podcast overhaul including new directory powered by Mediafly
Buy tickets, find lyrics & download music directly from your media player
New Windows 7 support including taskbar player controls
iTunes Library Import
Find & manage Add-ons directly in your media player
Available in 16 languages including Turkish, Romanian & Brazilian Portuguese
WebM video support
Control playback from your browser with the Winamp Toolbar (optional)
Selasa, 12 Oktober 2010

Senin, 11 Oktober 2010
ObjectDock 2.0 - Free Download

A program that lets you organize your short-cuts and running tasks onto an extremely customizable dock that sits on your desktop.
The ObjectDock install is quick and light, and the program is extremely easy to set up. A simple settings menu lets you choose how many items you want on the dock, where it is positioned, and whether you want zoom enabled. You can also adjust the size, style, and color as well as set it to autohide or remain on top.
Senin, 04 Oktober 2010
Fences Basic - Free Download

Download Now (9.04MB)
Basic Features
Rope off your desktop
Fences allows you to create shaded areas on your desktop that you can place icons in. You can label them however you wish, and move/resize them anywhere on the desktop. Pre-included layouts help speed the process for new users.
See your wallpaper again! Quickly hide & show all your icons with an easy double-click
Double click blank space on your desktop, and all your icons will fade out. Double click again, and they’ll return. We think this feature is so useful and unique, that we’ve applied for a patent on it. You can even pick icons and individual Fences to exclude!
Create snapshots, and have automatic scaling (for screen size changes)
Take and restore snapshots of your Fence layouts for backup, or for when you are doing different tasks. Change your resolultion for playing games and Fences will keep them in the same relative spots. In the Pro version of Fences, the "snapshot" feature has been enhanced to automatically take and keep recent snapshots on hand, ensuring your desktop layout never gets lost.
Minggu, 03 Oktober 2010
CursorFX Version 2.05 - Free Download

Overview
Stardock CursorFX is a program that lets you use and create incredibly cool looking Windows mouse cursors.
It does this by taking advantage of the new visual effects features of Windows XP and Windows Vista.
Adding a shadow under Windows XP and Vista was hardly a great advance and therefore CursorFX exists to give you more-much more.
CursorFX users can create and use cursors that look and feel far superior to anything you've ever seen before! Best of all, it's really easy to create your own super-charged cursors! It integrates into the standard Mouse interface of Windows and is easy to turn on and off as you need.
CursorFX is a replacement for Stardock's immensely popular cursor skinning program called CursorXP
Sabtu, 02 Oktober 2010
RocketDock! - Free Download

System Requirements:
- Windows 2000/XP/Vista/7
- 500Mhz or faster CPU
- 10MB RAM free
RocketDock is a smoothly animated, alpha blended application launcher. It provides a nice clean interface to drop shortcuts on for easy access and organization. With each item completely customizable there is no end to what you can add and launch from the dock.
Now with added Taskbar support your minimized windows can appear as icons on the dock. This allows for better productivity and accessibility.
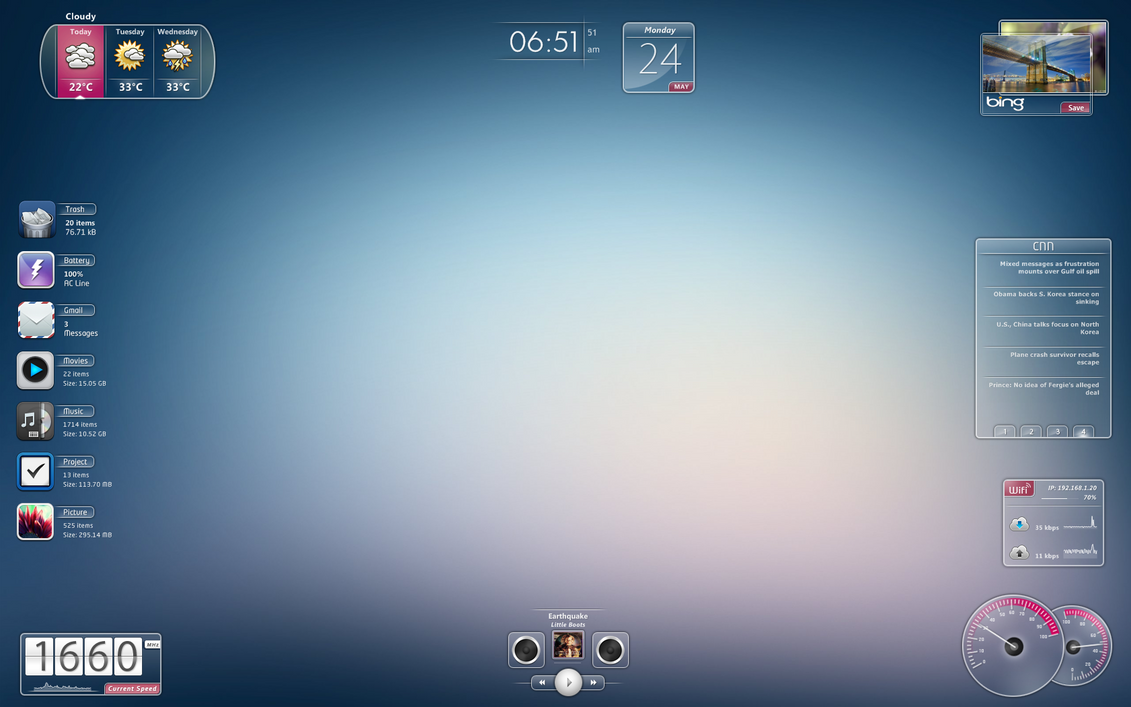
Rainmeter 1.3 - Free Download
Download Installer Version
Download Themes
Download
Once a skin is edited, Rainmeter will reflect the changes the next time it is refreshed. If the skin is already running, you will have to refresh it manually. Otherwise, just start the skin and your changes should be there.
Windows XP: C:\Documents and Settings\Your Name\My Documents\Rainmeter\Skins\
Windows Vista and 7: C:\Users\Your Name\Documents\Rainmeter\Skins
Basically, just head over to "My Documents" and look for the "Rainmeter" folder. In there you'll find the "Skins" folder. Once you're in there, make a new folder. Call this folder whatever you like. Within this folder make a new text document and call it whatever you like. Make sure that the text document's file extension is ".ini" and not ".txt". There you have it. You now have a brand new, albeit empty, skin. If you right-click the Rainmeter icon in the taskbar and choose "Refresh All", your new skin will be available for use. Don't start it up yet though, it doesn't do anything!
NOTE: You can only load one .ini file from a specific folder at once. If you want two skins to run simultaneously you will need to have each one in its own folder.


Active View - Shows a list of currently running skins

Browse View - Shows a list of all your skins

Tags View - Lists skins by "Tags" in "Metadata"

Control the Rainmeter program with Global Actions
Load, unload and edit skins with Skin Actions
Change a running skin's behavior with Skin Settings
By defaut, Rainmeter.ini is created by Rainmeter in:
Windows XP: C:\Documents and Settings\YourName\Application Data\Rainmeter
Windows Vista / Win7: C:\Users\YourName\Appdata\Roaming\Rainmeter
Rainmeter.ini can be edited by right-clicking the system tray icon for Rainmeter and saying "Edit Settings" or by using RainBrowser and clicking "Edit Settings" under "Global Actions".
There is a full explanation of the information in Rainmeter.ini at Manual - Settings, but there are a couple of things we should mention at a high level.
There are several [Sections] in Rainmeter.ini. Let's take a quick look at two of them.
[Rainmeter]
ConfigEditor="C:\Program Files\Notepad++\Notepad++.exe"
This setting will tell Rainmeter (and RainBrowser) which text editor you wish to use to edit skins and settings. The default is the built-in Windows Notepad application. Note: Do NOT use any editor which doesn't save plain text. Word for Windows or other "word processors" will cause problems.
SkinPath=C:\Users\YourName\Documents\Rainmeter\Skins\
This is normally set automatically by Rainmeter when you install the application. It will point to the place you use to store your "Skins".
[ConfigName]
There will be a section like this for each config you have ever loaded in Rainmeter. It keeps track of whether the skin is "active" and important skin settings. When you unload a skin, it is not removed from Rainmeter.ini, but is just marked "inactive". If you load and unload a lot of skins, maybe trying things out from download sites that you don't end up keeping, you might want to occasionally edit Rainmeter.ini and remove sections you will never need. A really large Rainmeter.ini with a lot of unneeded sections can slow down the initial load of Rainmeter a bit.
How to edit skins
Editing skins is a very simple matter. While every skin is a file with the extension ".ini", they're really just regular text documents. You can open any skin file with Notepad (or your preferred text editor) and edit them directly. It is important that your editor be a plaintext editor. That means no programs like Microsoft Word, Works, OpenOffice.org or any other document editor. You'll want one that does just text without the formatting.Once a skin is edited, Rainmeter will reflect the changes the next time it is refreshed. If the skin is already running, you will have to refresh it manually. Otherwise, just start the skin and your changes should be there.
How to create a new skin
To create a skin, you must first find your skins folder. If you installed Rainmeter normally, the skins folder will be found in one of these locations:Windows XP: C:\Documents and Settings\Your Name\My Documents\Rainmeter\Skins\
Windows Vista and 7: C:\Users\Your Name\Documents\Rainmeter\Skins
Basically, just head over to "My Documents" and look for the "Rainmeter" folder. In there you'll find the "Skins" folder. Once you're in there, make a new folder. Call this folder whatever you like. Within this folder make a new text document and call it whatever you like. Make sure that the text document's file extension is ".ini" and not ".txt". There you have it. You now have a brand new, albeit empty, skin. If you right-click the Rainmeter icon in the taskbar and choose "Refresh All", your new skin will be available for use. Don't start it up yet though, it doesn't do anything!
How to install skins
If you have a skin that was downloaded from he internet, installing it is very similar to creating a new skin. First, if the skin came in an archive (such as ".zip" or ".rar") you will need to extract it. Once the files are extracted, make sure that they are all contained within a single folder. Often, skin makers will havev this folder already in the archive. Otherwise, you will have to make it yourself. Move this folder to your Skins directory (one of the paths show in the section above). If Rainmeter is already running, right-click the icon in the taskbar and choose "Refresh All". Your downloaded skin should now appear in the "Configs" list.Loading a skin
To load a skin, first make sure that Rainmeter is already running. Right-click the icon in the taskbar to open the context menu and navigate to "Configs". Here, a list of all of the folders in your Skins directory should appear. From there just choose the folder holding the skin you want and load up the appropriate .ini file.NOTE: You can only load one .ini file from a specific folder at once. If you want two skins to run simultaneously you will need to have each one in its own folder.
Using Rainmeter
While using Rainmeter, you will want to load and unload skins, change certain settings of skins like transparency, position and other behaviors, refresh and exit Rainmeter. Interacting with Rainmeter can be done two ways. The first is through the "Context Menu" for Rainmeter found in the Windows System Tray, and the second is with the RainBrowser GUI application. They both do similar things, and it is up to you which you use.The Rainmeter system tray icon "Context Menu"
- About - Shows the version of Rainmeter and current values for all "measures"
- Help - Launches the Rainmeter Help system
- Configs - Shows all "skins" available for loading:

- Themes - Shows all available RainThemes "Theme" files
- Edit Settings - Edits Rainmeter.ini in your default text editor
- Refresh All - Refreshes all running skins
- Show Log File - Creates and / or displays the Rainmeter log file
- Running Skins - List of all skins currently loaded
Hover over a running skin to control many skin settings:
- Exit - Exit Rainmeter
RainBrowser
Active View - Shows a list of currently running skins
Browse View - Shows a list of all your skins
Tags View - Lists skins by "Tags" in "Metadata"
Control the Rainmeter program with Global Actions
Load, unload and edit skins with Skin Actions
Change a running skin's behavior with Skin Settings
Rainmeter.ini
The file Rainmeter.ini is used by Rainmeter for global settings, as well as keeping track of the currently loaded skins and settings for them.By defaut, Rainmeter.ini is created by Rainmeter in:
Windows XP: C:\Documents and Settings\YourName\Application Data\Rainmeter
Windows Vista / Win7: C:\Users\YourName\Appdata\Roaming\Rainmeter
Rainmeter.ini can be edited by right-clicking the system tray icon for Rainmeter and saying "Edit Settings" or by using RainBrowser and clicking "Edit Settings" under "Global Actions".
There is a full explanation of the information in Rainmeter.ini at Manual - Settings, but there are a couple of things we should mention at a high level.
There are several [Sections] in Rainmeter.ini. Let's take a quick look at two of them.
[Rainmeter]
ConfigEditor="C:\Program Files\Notepad++\Notepad++.exe"
This setting will tell Rainmeter (and RainBrowser) which text editor you wish to use to edit skins and settings. The default is the built-in Windows Notepad application. Note: Do NOT use any editor which doesn't save plain text. Word for Windows or other "word processors" will cause problems.
SkinPath=C:\Users\YourName\Documents\Rainmeter\Skins\
This is normally set automatically by Rainmeter when you install the application. It will point to the place you use to store your "Skins".
[ConfigName]
There will be a section like this for each config you have ever loaded in Rainmeter. It keeps track of whether the skin is "active" and important skin settings. When you unload a skin, it is not removed from Rainmeter.ini, but is just marked "inactive". If you load and unload a lot of skins, maybe trying things out from download sites that you don't end up keeping, you might want to occasionally edit Rainmeter.ini and remove sections you will never need. A really large Rainmeter.ini with a lot of unneeded sections can slow down the initial load of Rainmeter a bit.
StyleXP - Free Download
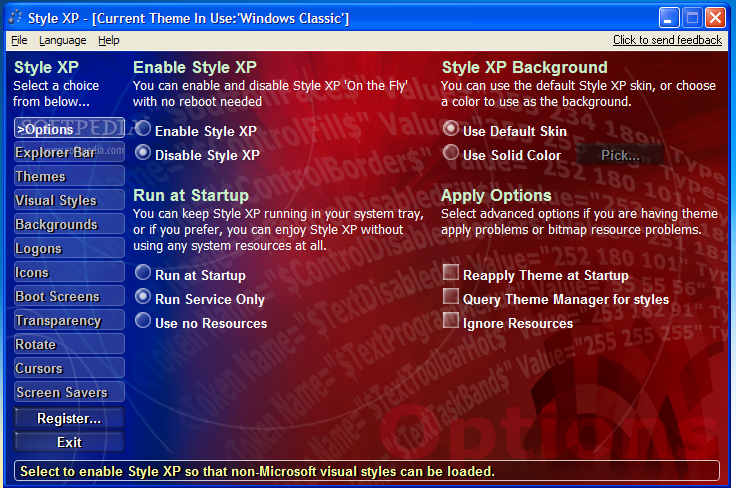
Description of Style XP
Ever wish your desktop could shed its skin and grow into a more powerful animal? Style XP gives your XP desktop a sleek look of your choosing and helps you get more out of your PC. Not just a skinning engine, this themeing software lets you use your own graphics to build your own visual styles.
Style XP harnesses the power of XP's built-in visual style engine to run new desktop themes without making a dent in your PC's system resources. If you prefer to noodle with the styles, you can sacrifice a little RAM to run Style XP from the System Tray. Style XP comes with several themes beyond the now-stale XP standards, and ThemeXP.org offers hundreds more.
Style XP's themes are more than a pretty face for your desktop. Like XP's original styles, they offer three sizes of fonts to keep screens legible for everybody. And Style XP's attention to higher-DPI resolution helps you get the most out of your monitor.
Langganan:
Postingan (Atom)